

In the previous Waveguide series with Mark Ryan from Super* Review, we discussed different products in an audio chain and placed them in a ranking list covering everything from IEMS to their ear tips, cables, etc. In that previous blog/Video, Mark mentioned that he doesn’t believe in cables bringing changes in the sound performance of the IEMS, yet, today we are going to explore the world of cables from his point of view.
Today’s topic is IEM cable customization and how Super* review would like you to stance your IEMS for the best level of comfort and perfect aesthetic appeal. We would also like to share our opinions and suggest you ways to enhance the aesthetic appeal and usability of your IEMS with simple cable rolling tips. Let’s get your reading glasses, pour yourself a cup of coffee, and begin with our today’s blog.

A Short Disclaimer:-
This blog is based on the video made by Super* Review; all thoughts and opinions are his own. We are just summarizing the video for people who are interested in reading his views on Perfect Cables and how to Stance them. You can watch his complete video on his YouTube Channel. Let’s begin with today’s blog.
As mentioned previously in the previous Wave Guide Blog, Mark doesn’t believe in cables bringing a lot of change in the sound performance of the IEMS. However, he loves to customize cables for improvements in aesthetics, comfort, and functionality. This not only includes buying aftermarket cables, but also includes swapping the cables from different IEMS or simply making light modifications to achieve the desired comfort and functionality change. Rather than Cable Rolling, this is something that we call Stancing. We will describe this in simple language so that both beginner and experienced audiophiles can understand the process. Let’s begin with the very first thing that we need to do.

1. Finding the Right Cable:-
The first step in standing is to find the right cable. Now, this can be a personal opinion, but we like to match the cable to the IEM based on the color. This can be the same color, like giving a Blue cable to the Blue IEMS of AFUL Cantor, or treating a contrasting cable like a Black cable with Silver colored Sennheiser IE600 ear shells. Another important thing to finding the perfect cable would be the weight. By this, we mean consider the weight of the IEM shells as well as the IEM cable. This matters a lot in achieving better comfort, for example, DUNU Glacier comes with heavy stainless steel shells. They don’t go well with a lightweight cable. Similarly, Sennheiser IE600 features lightweight and compact ear shells, which work perfectly well with a lightweight cable. Once you have chosen a cable for our IEM based on your personal preferences about weight and color, it’s time to go to the second level.
2. Fixing the Shape of the cable(Reshaping the Earhooks):-
In this section, we will learn how to reshape the ear hook and make the cable better in comfort. The major problem with the stock cables, even the aftermarket ones as well is that the bottom portion of the preformed ear hooks are not curved and have a straight finish. It just prevents the cable from wrapping up in a tidy manner, We can actually solve this issue quite easily.
For this, you can simply use either hot water or a hair dryer. Make sure you don’t have the IEMS connected to the cable, You can either submerge the cable from the ear hooks side inside hot water(make sure not to submerge any of the connectors into the water, also use a hair dryer as a safer option. Using the hair dryer, you can actually focus heat on a particular area where you need to reshape the curl. Our target here is to heat the ear hooks and reshape them. Once they cool down, they will hold on to the shape that we put them into after heating up. In order to do this reshaping properly, you need to take some precautions.
Align the cable as straight as possible and then put a masking tape joining both sides perfectly. After that, give the cable a nice uniform wrapping. Heat up the cable now using your hair dryer and readjust the shape of the cable to your desired uniform shape when it’s hot. Once the cable cools down, it will hold on to this uniform shape for the ear hooks. This greatly improves the aesthetics of the cable and also enhances the wearing comfort with a more uniform wrapping around the ear.

3. Adding Features(Chin Slider, etc.):-
Once we have got the cable in a clean, uniform shape, it’s time to add some features like the Chin Slider. Chin Slider plays a crucial role in wearing comfort and management for the cable on the go. While many cables come with Chin Sliders, there are times when a Chin Slider is not available. This is easily fixable with Silicone O-Rings.
These are easily available on Aliexpress, Amazon, and other online marketplaces. You can also find these Silicone O-rings at your local hardware store. We suggest using a decently thick silicone o-ring for proper Chin Slider implementation. We suggest Silicone O-Rings with 7mm outer diameter, 3mm inner diameter, and 2mm thickness. Adding the chin slider is really easy, just slide it over from the Connector’s side and take it all the way till the Y-splitter.
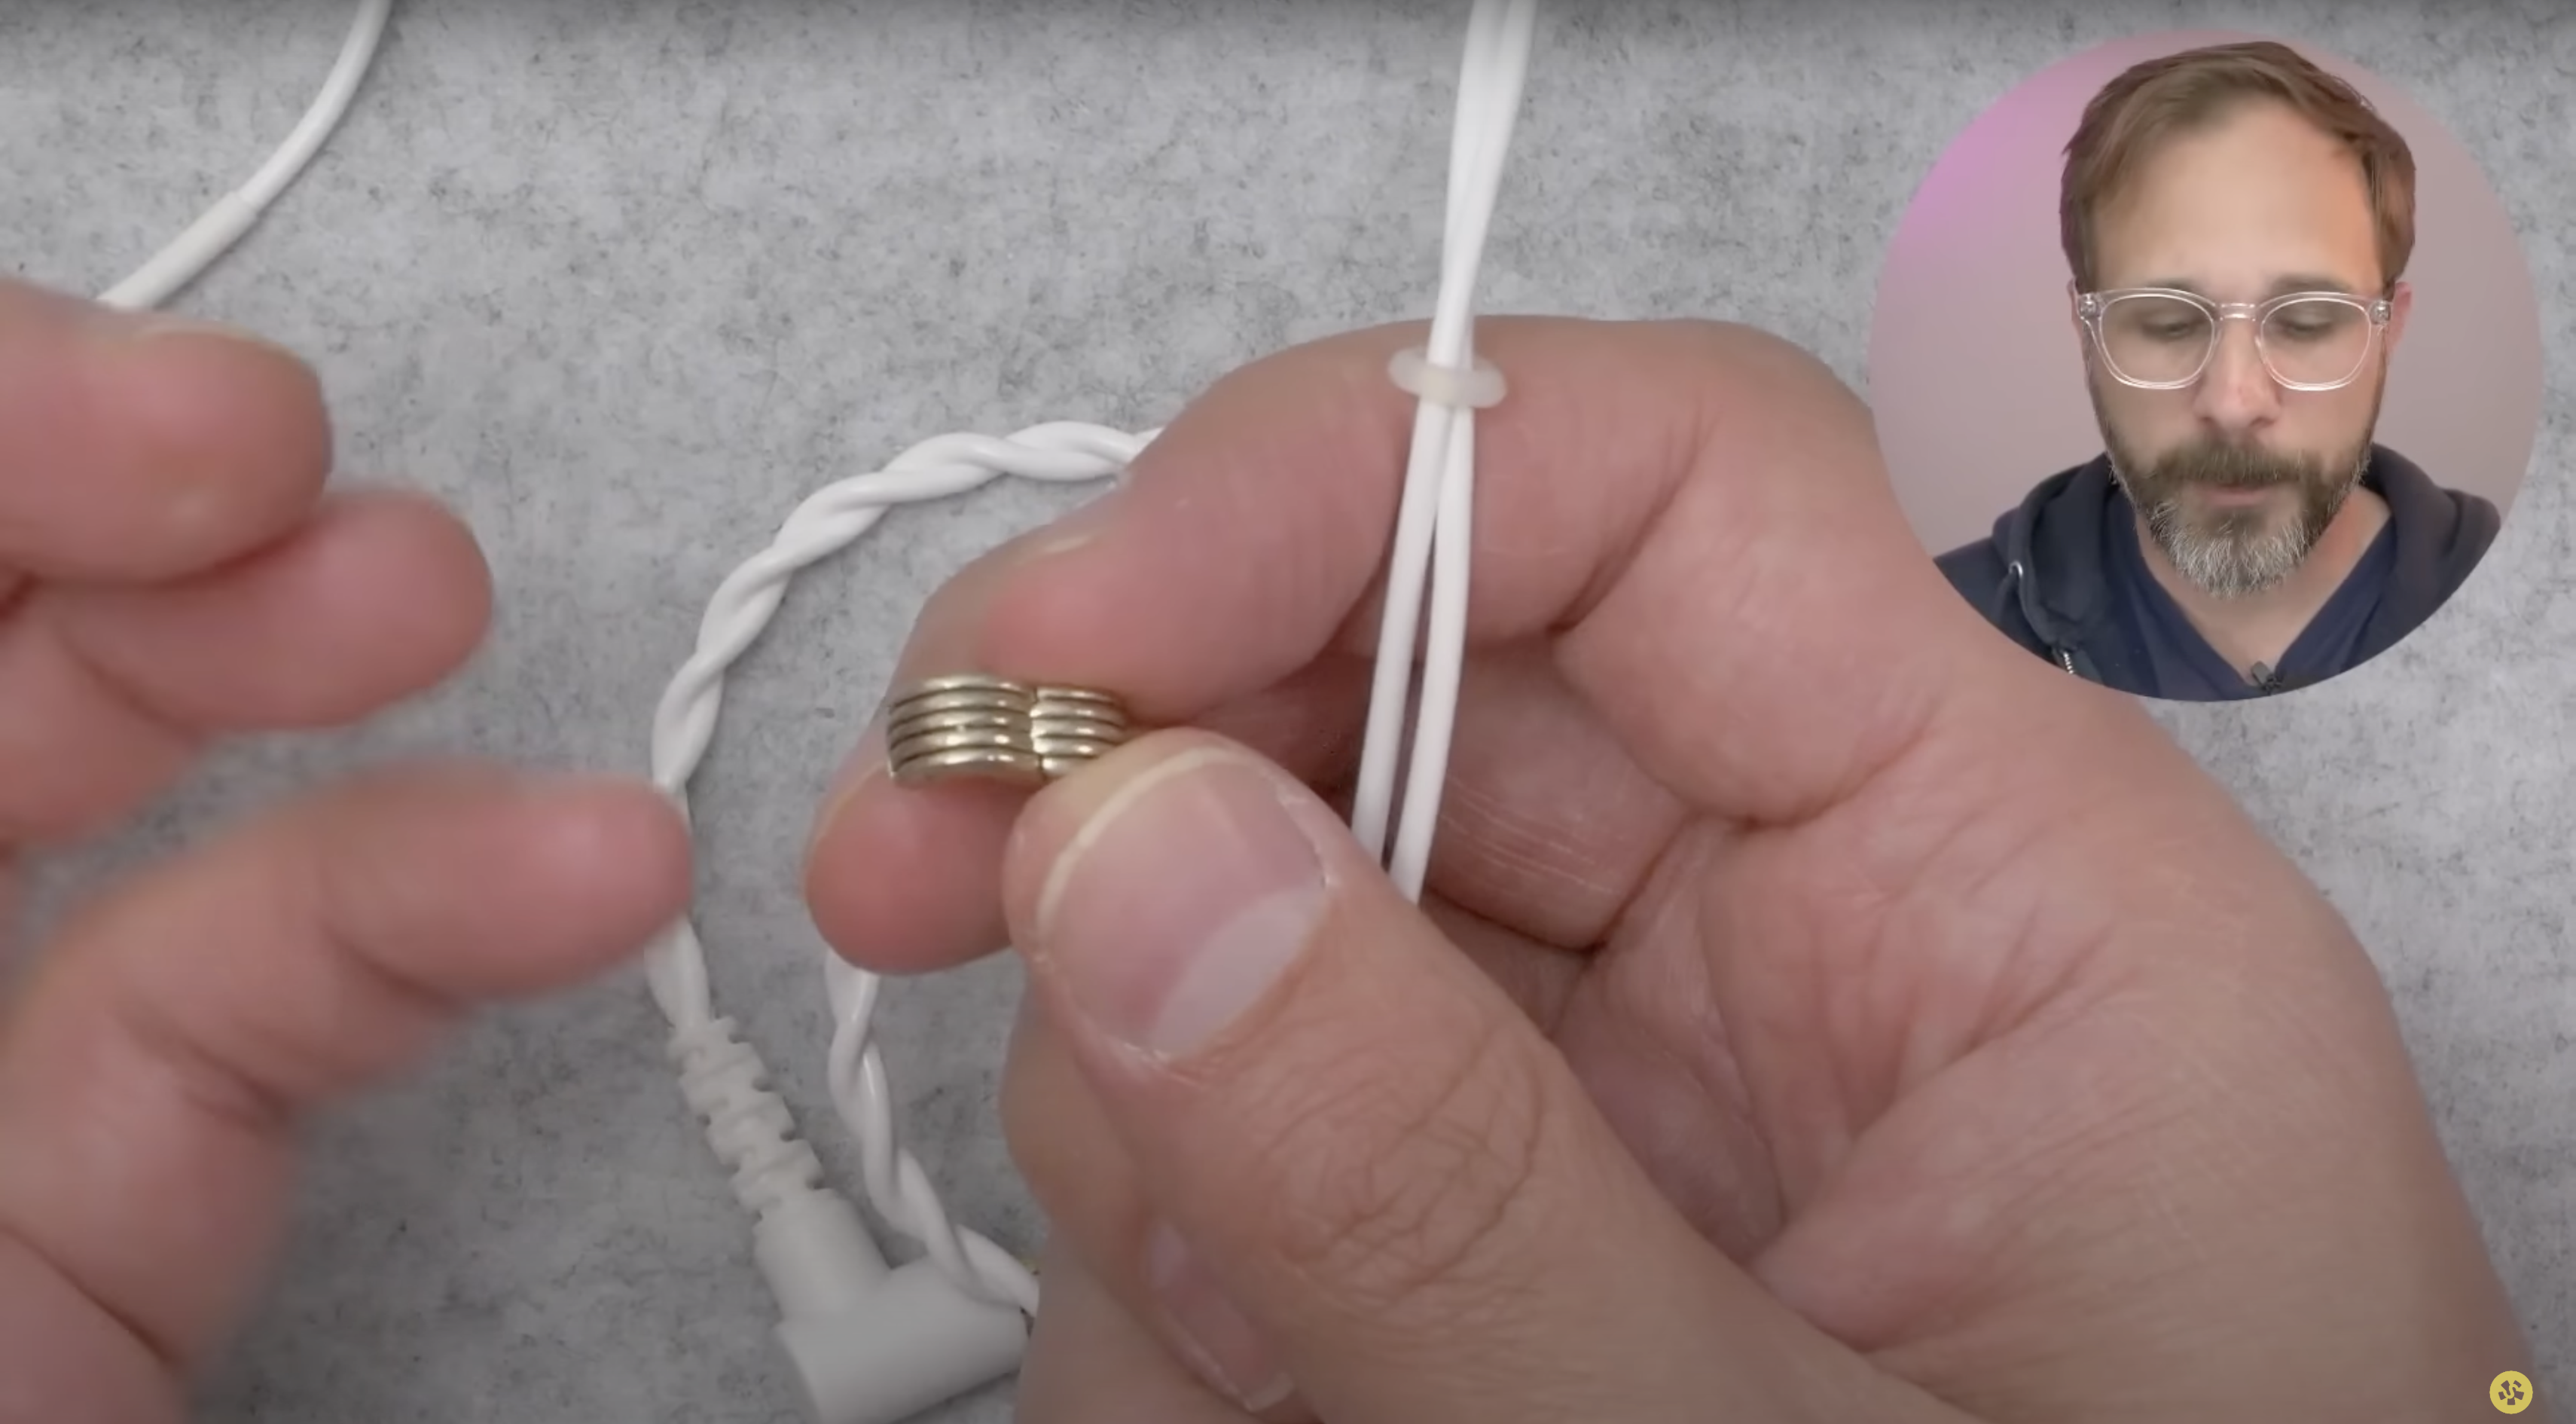
It not only protects your cable from tangling but also helps in enhancing wearing comfort. You can also use art and craft designer locking beads and place them around the Silicone O-ring on your cable. This will give you a really nice designer chin slider to your cable. If you can’t find a Silicone O-ring, then you can also use spare ear tips to create your chin slider. Simply use spare ear tips, cut off the core from the ear tips and use this core as a chin slider. Just like the Silicone O-Ring, putting the core of the spare ear tips is easy. Slide it over from the connector side.
The second feature we would like to add to our cables would be the Left and Right indicator. While most cables have a Right and Left indicator, although they are hard to notice as they are placed on small connectors. You can fix this as well by simply using a red color silicone O-ring. This O-Ring is smaller than the previous one, about 5mm in outer diameter, 2mm inner diameter, and 1.5mm thickness. You can put this Red colored O-ring on the right side connector to denote the right side. This saves a lot of struggle to recognize the connectors, the Red Silicone O-Ring one is on the Right side now. These two are simple yet effective features that should be added to every cable as they improve both aesthetics as well as usage comfort.
4. Roadie Wrap:-
A nice way to keep your IEMS neat and tidy is to give them a nice Roadie wrap. It is important as it helps you manage your IEM collection properly and also keeps them organized. This also prevents your cables from tangling as much as they would with sloppy wrapping. It also keeps your cable healthy and flexible; the cable doesn’t get stiff or unnecessarily stuck in an awkward position due to sloppy or bad wrapping technique.

Roadie wrapping is easy to do; we will tell you how to do that. Hold the cable from the termination plug in one hand like you usually do for wrapping up your cable. Now hold the cable with the other hand and wrap it, adding a slight bit of twist to it. You will notice that the cable itself will start to coil up. You can also alternate the twisting direction with every warp, which would also help in doing a proper Roadie wrap.
Final Words:-
That is how we like to customize and stance almost all of our cables. From choosing the perfect one to simply keeping them nice, tidy, and properly organized in our collection. You can use these tips to take good care of your IEM cables and can also modify their shape for better comfort. Which tip did you like the most?? If you have any questions or queries, you can write to us at support@hifigo.com.
Super* Review's "Wave Guide," supported by HiFiGo, is a curated collection of videos designed to assist audiophiles in optimizing their listening experience. This series offers practical tips, tutorials, and how-to guides on topics such as parametric equalization (PEQ), app recommendations, and proper in-ear monitor (IEM) usage. By providing clear and concise information, the Wave Guide aims to help both newcomers and seasoned enthusiasts get the most out of their audio equipment.
Additionally, HiFiGo will continue to update these articles to help more audio newcomers and enthusiasts gain deeper product knowledge. If you're interested, feel free to explore more guide articles and product news.
1. Perfect Cables: How To Stance Your IEM Cables Waveguide


Leave a comment
All comments are moderated before being published.
This site is protected by hCaptcha and the hCaptcha Privacy Policy and Terms of Service apply.